Webhooks on your localhost with the Hookdeck CLI
Learn how to receive webhooks on your localhost with the Hookdeck CLI
Introduction
This guide demonstrates how to receive a webhook from services such as Resend, Twilio, Shopify, and Stripe on your localhost development environment using the Hookdeck CLI. You’ll learn how to set up your environment, run the Hookdeck CLI, receive webhooks, and replay webhooks from the Hookdeck Console to test your code during development.
Setup
Step 1: Install the Hookdeck CLI
Via NPM:
npm i hookdeck-cli -g
On Mac:
brew install hookdeck/hookdeck/hookdeck
On Windows:
scoop bucket add hookdeck https://github.com/hookdeck/scoop-hookdeck-cli.git
scoop install hookdeck
Step 2: Create and run a localhost web server
Install Flask to use as the web server:
pip install -U Flask
Create a server.py
file in the project root:
from datetime import datetime
import json
import logging
from flask import Flask, request
# Configure logging to output to the console
logging.basicConfig(
level=logging.INFO,
handlers=[logging.StreamHandler()]
)
app = Flask(__name__)
app.logger.setLevel(logging.INFO)
# Define a route to handle POST requests sent to /webhook
@app.route("/webhook", methods=["POST"])
def handle_hello_webhook():
# Log the received webhook with the current timestamp and JSON payload
app.logger.info("webhook_received %s %s",
datetime.now().isoformat(),
json.dumps(request.json, indent=2))
# Respond with a status of ACCEPTED
return {
"status": "ACCEPTED"
}
if __name__ == "__main__":
# Run the Flask app on port 3030 in debug mode
app.run(debug=True, port=3030)
Run the server:
python server.py
Step 3: Create a localtunnel with the Hookdeck CLI
In a new terminal window, run the following command to create a localtunnel:
hookdeck listen 3030 my-webhook
The output will look similar to the following:
Dashboard
👤 Console URL: https://api.hookdeck.com/signin/guest?token={token}
Sign up in the Console to make your webhook URL permanent.
my-webhook Source
🔌 Event URL: https://hkdk.events/{id}
Connections
my-webhook -> cli forwarding to /
> Ready! (^C to quit)
Trigger a webhook
Step 4: Trigger a test webhook with a cURL command
Run the following cURL command to act as an inbound webhook, replacing the {URL}
with the Event URL from the Hookdeck CLI output:
curl -X POST {URL}/webhook \
-H "Content-Type: application/json" \
-d '{"message": "Hello, World!"}'
The cURL command output will be similar to the following:
{"status":"SUCCESS","message":"Request handled by Hookdeck. Check your dashboard to inspect the request: https://dashboard.hookdeck.com/requests/req_[id]","request_id":"req_[id]"}%
You will see the terminal running the Hookdeck CLI log the inbound webhook:
2024-07-09 19:06:46 [200] POST http://localhost:3030/webhook | https://console.hookdeck.com/?event_id={id}
You will also see the Python server log the inbound webhook:
INFO:server:webhook_received 2024-07-09T19:06:46.043305 {
"message": "Hello, World!"
}
INFO:werkzeug:127.0.0.1 - - [09/Jul/2024 19:06:46] "POST /webhook HTTP/1.1" 200 -
Step 5: Trigger a test webhook from the Hookdeck Console
Open the Console URL from your terminal in your browser.
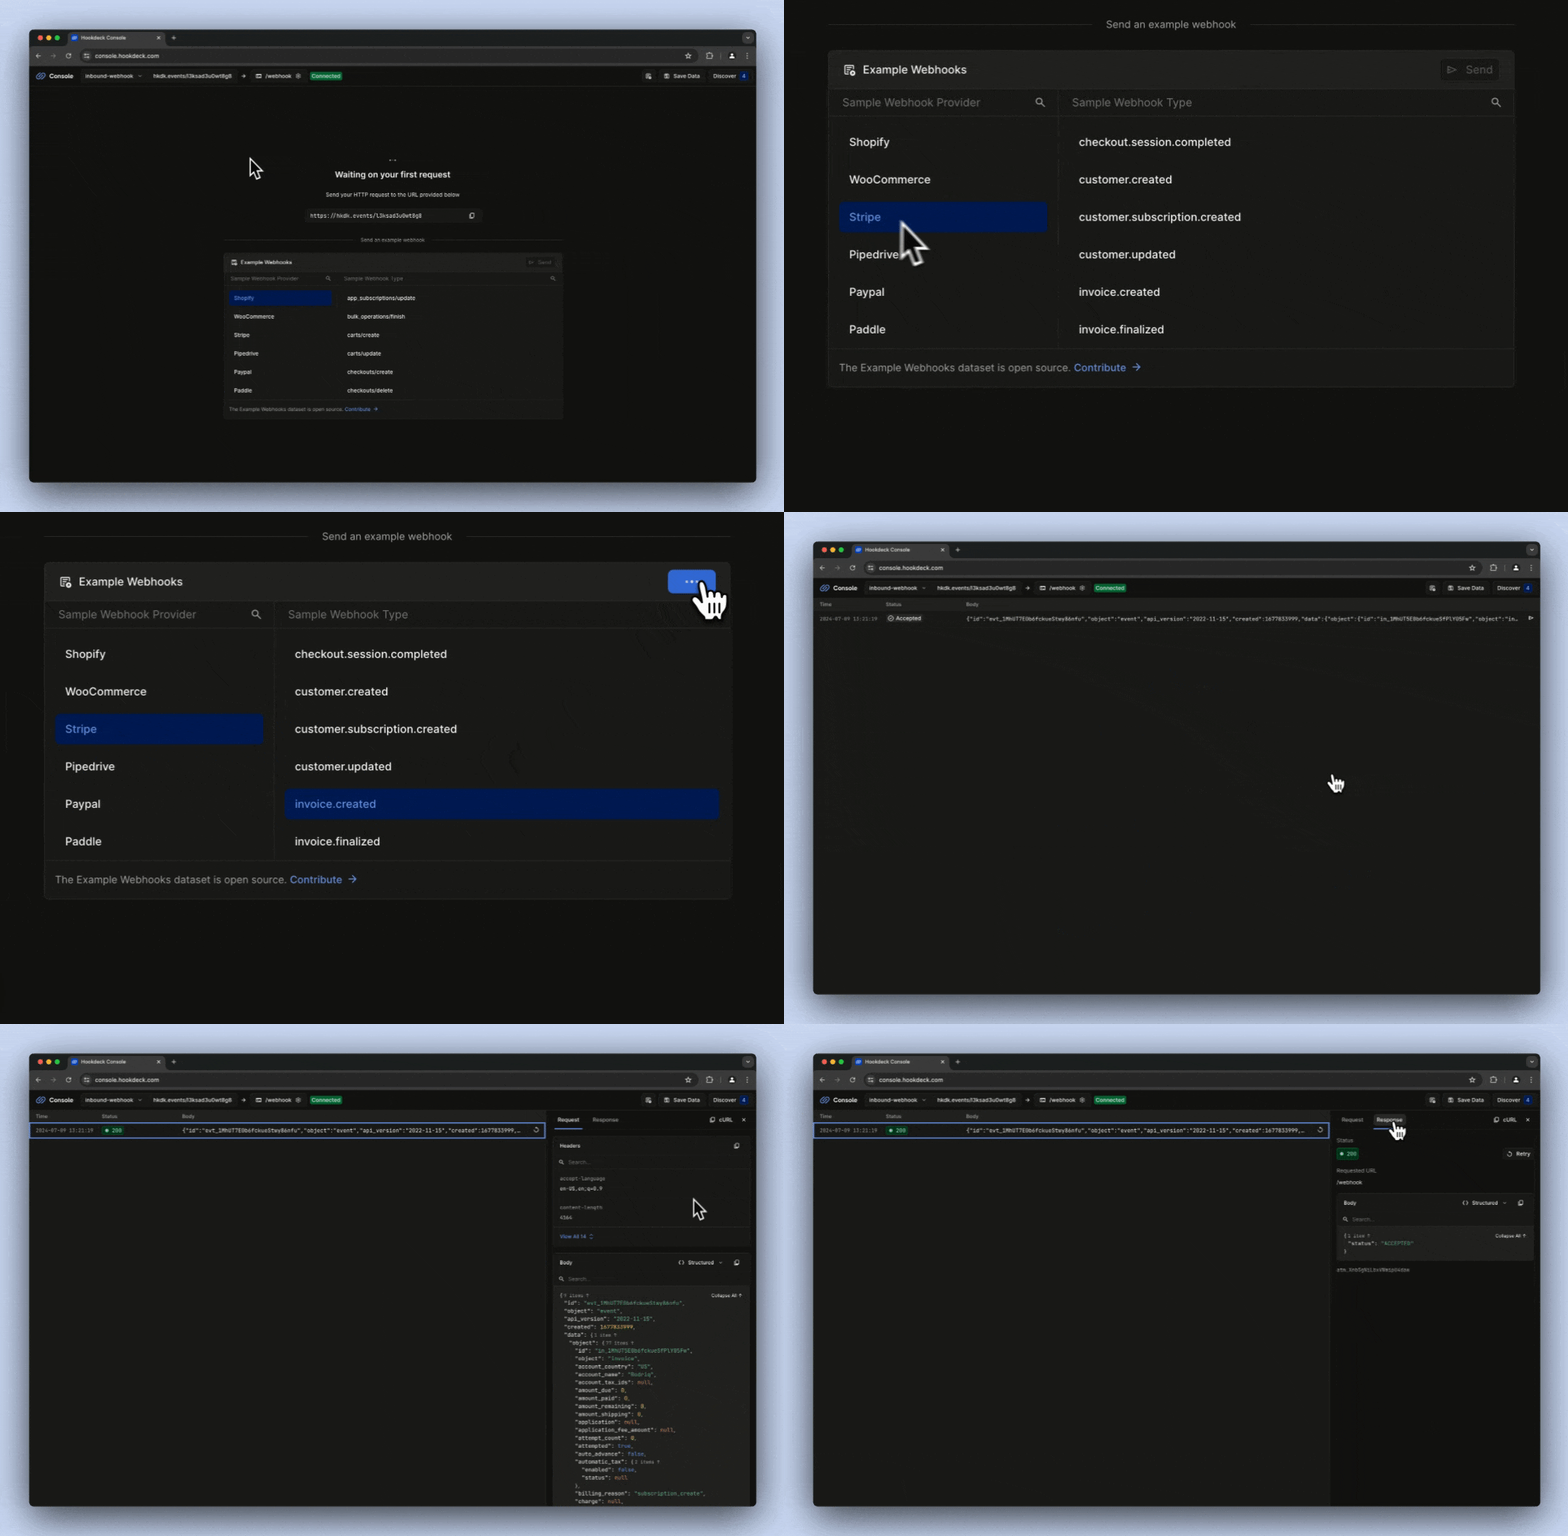
Choose a Sample Webhook Provider from the list of Example Webhooks. For example, Stripe.
Select a Sample Webhook Type from the list on the right. For example, invoice.created.
Click Send.
The Hookdeck Console will show the test webhook has been triggered. You can also inspect the webhook payload and the localhost web server response.
You will see the terminal running the Hookdeck CLI log the inbound webhook:
2024-07-09 19:06:46 [200] POST http://localhost:3030/webhook | https://console.hookdeck.com/?event_id={id}
You will also see the Python server log the inbound webhook:
INFO:server:webhook_received 2024-07-09T19:06:46.043305 {
"id": "evt_1MhUT7E0b6fckueStwy86nfu",
"object": "event",
"api_version": "2022-11-15",
"created": 1677833999,
"data": {
...
},
"type": "invoice.created"
}
INFO:werkzeug:127.0.0.1 - - [09/Jul/2024 19:06:46] "POST /webhook HTTP/1.1" 200 -
Step 6: Replay the webhook
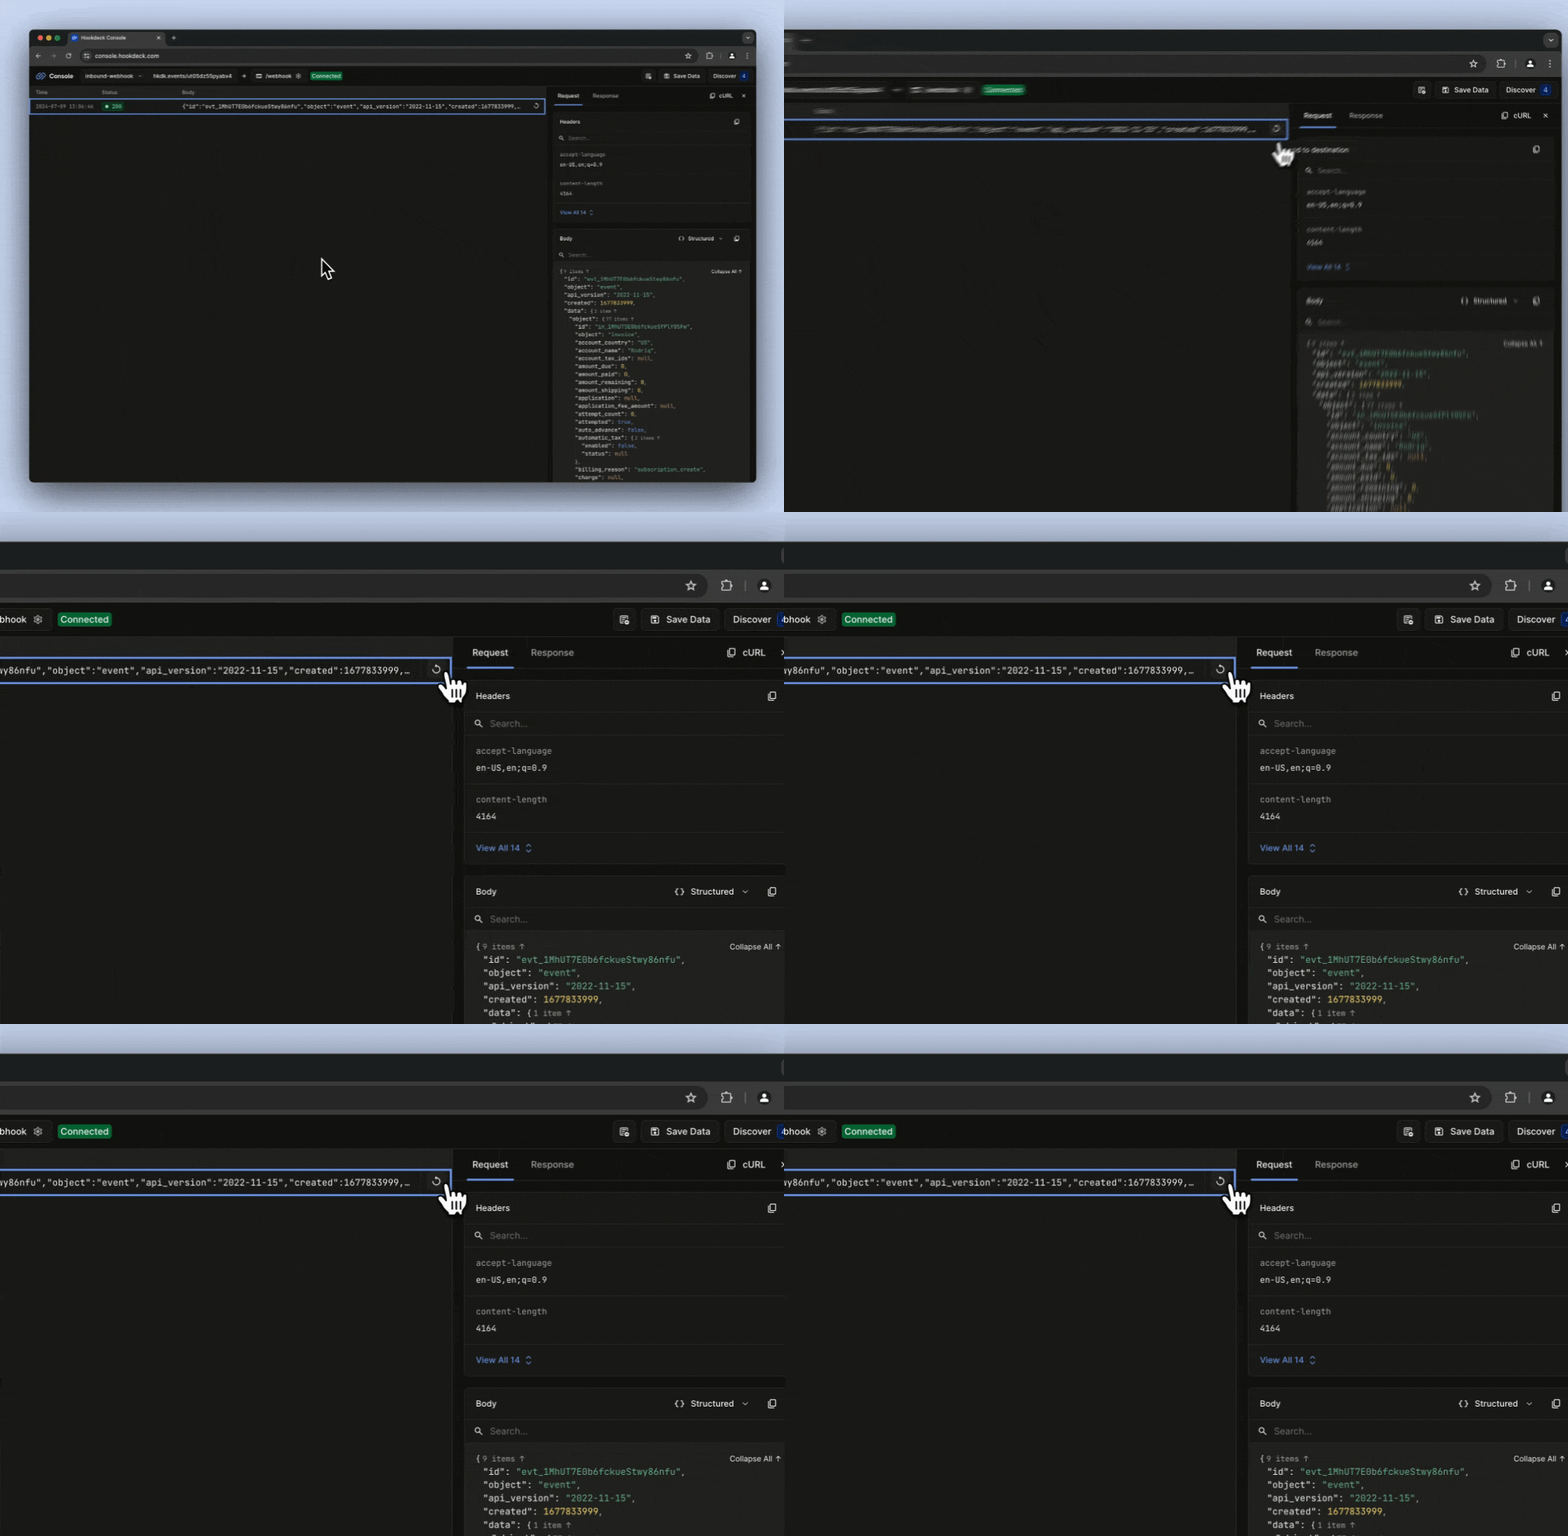
From the Hookdeck Console, click the Resend to destination button to replay the webhook.
Step 7: Trigger and receive a webhook from an API platform
Copy the Event URL from the Hookdeck CLI output. The same URL can also be found in the Hookdeck Console.
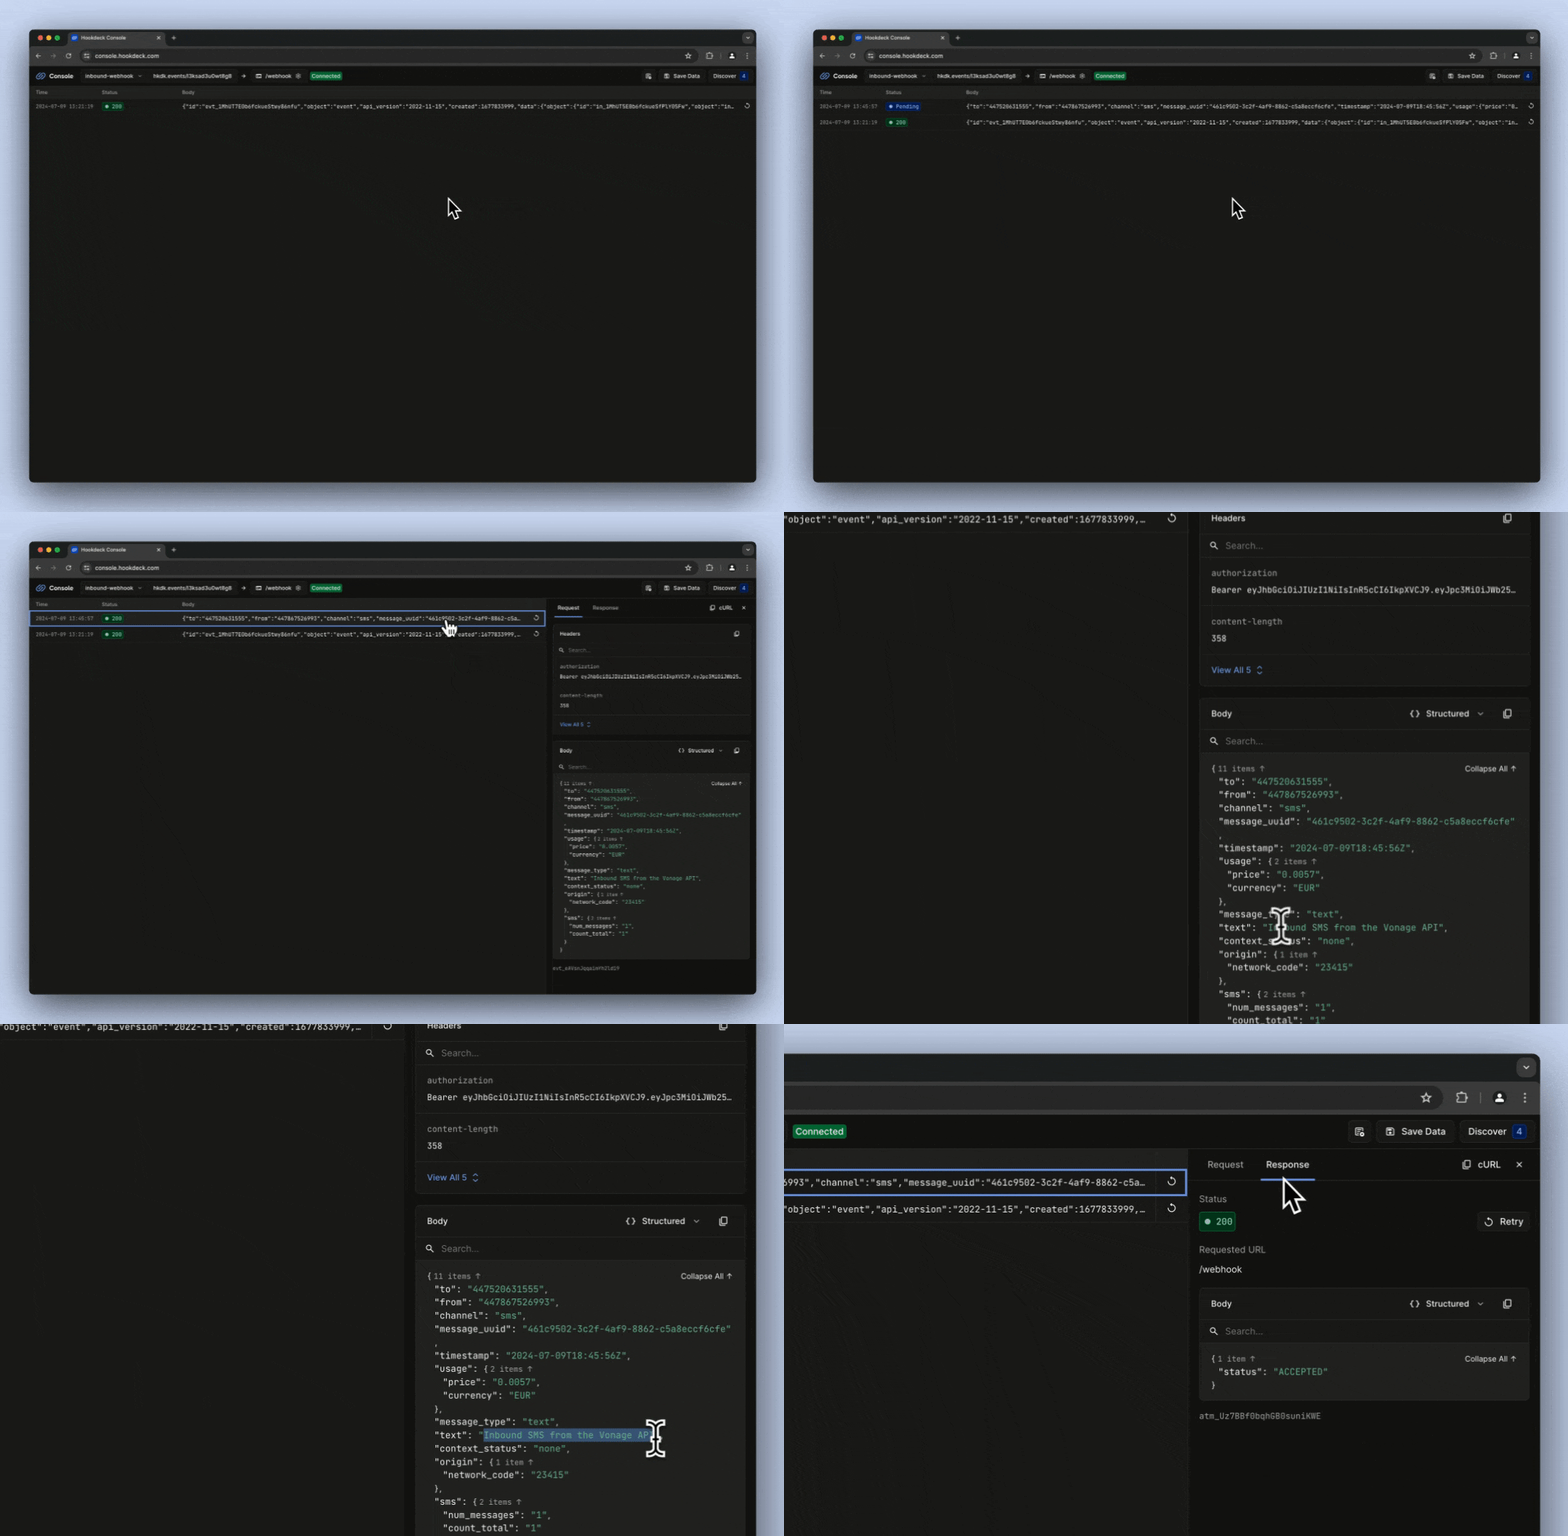
Go to the API provider platform, such as Resend, Twilio, Shopify, or Stripe, and register the Hookdeck URL as the webhook URL with the provider.
Trigger a webhook from your chosen API provider, and you will see a log entry appear in the Hookdeck console.
Additionally, you will see the webhook logged in the Hookdeck CLI:
2024-07-09 19:45:57 [200] POST http://localhost:3030/webhook | https://console.hookdeck.com/?event_id={id}
And by the Python server running in your local development environment:
INFO:werkzeug:127.0.0.1 - - [09/Jul/2024 19:21:19] "POST /webhook HTTP/1.1" 200 -
INFO:server:webhook_received 2024-07-09T19:45:57.087114 {
"to": "{to_number}",
"from": "{from_number}",
"channel": "sms",
"message_uuid": "461c9502-3c2f-4af9-8862-c5a8eccf6cfe",
"timestamp": "2024-07-09T18:45:56Z",
"usage": {
"price": "0.0057",
"currency": "EUR"
},
"message_type": "text",
"text": "Inbound SMS from the Vonage API",
"context_status": "none",
"origin": {
"network_code": "23415"
},
"sms": {
"num_messages": "1",
"count_total": "1"
}
}
INFO:werkzeug:127.0.0.1 - - [09/Jul/2024 19:45:57] "POST /webhook HTTP/1.1" 200 -
Conclusion
You have successfully received a webhook on your localhost development environment using the Hookdeck CLI! You also inspected the webhook payload and server response and replayed a webhook using the Hookdeck console.
This guide provided a basic example to get you started. You can now expand on this by creating a Hookdeck account, trying features such as transformations, and filtering, benefitting from functionality like configurable retries, and generally using Hookdeck as your reliable inbound webhook infrastructure.